Did you know the average household spends over $3,000 a year on dining out? That used to be me, standing in line for a $15 bowl that was half rice! I got tired of it. So, I started making my own ground beef burrito bowl at home, and let me tell you, it changes everything. It’s fast. It’s fresh. And honestly? It tastes way better! Whether you are looking for a quick weeknight dinner or a solid meal prep option, this recipe saves the day. Let’s get cooking!
 1")
Choosing the Best Ingredients for Your Burrito Bowl
Look, I have ruined enough dinners in my time to know that ingredients actually matter. I remember standing in the grocery aisle years ago, grabbing the cheapest pack of ground beef and a bag of “instant” rice, thinking it wouldn’t make a difference. Spoiler alert: it did.
The result was a dry, flavorless mess that my family politely pushed around their plates. It was embarrassing. Since then, I’ve learned that for a killer ground beef burrito bowl, you don’t need fancy stuff, but you do need the right stuff.
The Meat Situation
When it comes to the beef, I usually grab 80/20 ground chuck. I know, I know, we are all trying to be a little healthier. But I tried using the super lean 96/4 stuff once during a “health kick,” and it tasted like seasoned cardboard.
Fat equals flavor, folks. If you use 80/20, you get that juicy, melt-in-your-mouth texture that makes taco night awesome. You can always drain the excess grease after browning it. If you really want to go leaner, 90/10 is the compromise, but I wouldn’t go lower than that unless you want dry meat.
Rice and Grains
I used to mess this up constantly. I’d use sticky sushi rice or whatever was in the pantry. For a bowl that feels like it came from a restaurant, you want long-grain white rice or Jasmine rice.
It fluffs up better and doesn’t turn into a gloopy mush when you mix in the salsa. If you are doing low carb, cauliflower rice works, but please roast it first! Boiled cauliflower rice is just sad and wet.
The “Freshness” Factor
Here is a hill I will die on: grate your own cheese. Please. That bag of pre-shredded cheese? It is coated in potato starch or cellulose to keep it from clumping in the bag.
That coating stops it from melting properly. It just sits on top of your hot beef looking rubbery. Grab a block of sharp cheddar or Monterey Jack and a box grater. It takes two minutes, and the taste is completely different.
Also, don’t sleep on the produce. Nothing—and I mean nothing—is more heartbreaking than cutting into an avocado that is brown inside. I’ve learned to buy them rock hard a few days early and let them ripen on the counter. It’s a patience game, but a fresh, creamy avocado can save even a mediocre bowl.
A Note on Seasoning
We will get to the cooking part in a minute, but check your spice cabinet. If that jar of cumin has been there since 2018, throw it out. Old spices lose their punch, and you’ll end up wondering why your food tastes bland. Fresh chili powder and cumin are non-negotiable here.
 2")
Mastering the Homemade Taco Seasoning Blend
Okay, confession time. For years, I was addicted to those little yellow packets from the store. You know the ones. I’d buy them ten at a time because I was terrified of running out.
Then one Tuesday (it’s always a Tuesday, right?), I had the ground beef browning in the pan, reached into the pantry, and… nothing. No packets. Just an empty cardboard box that someone (probably me) put back on the shelf. I panicked. I actually considered ordering pizza because I thought I couldn’t make tacos without “The Packet.”
That moment of desperation turned into a huge win. I grabbed my phone, looked up a recipe, and threw some spices together. I haven’t bought a packet since.
Why You Should Ditch the Packet
First off, have you ever looked at the ingredients on those things? The first ingredient is usually corn flour or salt. You are basically paying for salty thickener. When I made my own homemade taco seasoning for the first time, the difference was wild. It didn’t taste like “chemicals.” It tasted like actual food.
Plus, I realized those packets are loaded with sodium. I felt way less bloated after eating my homemade version. It’s a small change, but your body notices.
The Holy Trinity of Spices
You don’t need a culinary degree to mix this up. You really just need a few basics that are probably sitting in your rack right now.
- Chili Powder: This is the base. Don’t skimp on it.
- Cumin: This gives it that earthy, taco-shop smell. Fun fact: I once spilled an entire jar of cumin on my floor. My kitchen smelled like a burrito for a month.
- Smoked Paprika: This is the secret weapon. Regular paprika is fine, but smoked paprika adds a depth that mimics grilled meat. Trust me on this one.
I usually toss in some dried oregano and garlic powder, too. If the spices look a little clumpy, just smash them with the back of a spoon. It doesn’t have to be perfect.
controlling the Heat
Here is the best part about making it yourself: you control the fire. The packets are usually “mild” or “burn your face off,” with no in-between.
I made the mistake once of adding a tablespoon of cayenne pepper instead of a teaspoon. My family was sweating and chugging milk. It was a disaster. Now, I keep it simple. I add just a pinch of red pepper flakes or cayenne. If I want it hotter, I can add hot sauce to my own bowl later. That way, the kids or guests who hate spice can still enjoy the ground beef burrito bowl without crying.
The “Lazy Cook” Storage Hack
I am lazy. I do not want to measure out seven different spices every single time I cook dinner. So, here is what you do.
Get a small mason jar or an old jam jar (wash it first, obviously). Multiply your recipe by five or ten. Mix it all up in the jar and shake it like a polaroid picture. Now you have your own “house blend” ready to go. When it’s time to cook, just use about two tablespoons of your mix per pound of beef.
It saves so much time on busy nights. Plus, it looks cute sitting on the counter, like you really have your life together.
 3")
Step-by-Step Instructions to Cook the Ground Beef
I used to think cooking ground beef was foolproof. You just throw it in a pan and stir, right? Well, for the longest time, my taco meat looked grey and sad. It looked like it had been boiled in a shoe.
It turns out, there is actually a technique to getting that rich, restaurant-style texture for your ground beef burrito bowl. If you just dump cold meat into a cold pan, you are setting yourself up for failure. I learned this the hard way when I tried to impress a date with my cooking skills and served them mushy, grey beef. Not my finest hour.
The Browning Phase
First, get your pan hot. I prefer a cast iron skillet because it holds heat like a champ, but any heavy-bottomed pan works. Let it heat up for a minute or two before the meat touches it.
When you drop the beef in, you should hear a loud sizzle. If it’s quiet, your pan isn’t hot enough. Here is the trick I learned: don’t touch it immediately.
I used to stir it constantly like a maniac. But if you let it sit undisturbed for a minute or two, it develops a nice brown crust. That crust is where all the flavor lives. Once you get that sear, then you can go in with a wooden spoon and break it up.
Dealing with the Grease
Okay, once the meat is browned, you’re usually left with a pool of liquid fat. This is controversial, but I don’t drain all of it.
If you drain every drop, your meat will be dry as a bone. I usually tip the pan and spoon out most of the grease, leaving maybe a teaspoon or two behind. It keeps the beef juicy. I keep an empty soup can under the sink specifically for this grease because pouring it down the drain is a plumbing nightmare waiting to happen. My husband learned that one after a very expensive visit from a plumber.
Making it Saucy (The Magic Step)
Here is where the magic happens. After you drain the fat, add your homemade seasoning mix. But don’t stop there.
For the longest time, I would just stir in the dry spices. The result? gritty meat. The secret is to add a splash of water or beef broth—about 1/4 to 1/2 cup.
Pour it in with the spices and let it simmer on low. The water helps the spices “bloom” and coat every single crumble of beef. It creates a thick, glossy sauce that clings to the meat. Let it bubble until the liquid reduces and the mixture looks thick, not watery. This takes about 3 to 5 minutes.
I also like to throw in some diced onions right at the beginning with the beef. If you forget (like I often do), you can use onion powder, but fresh onion adds a nice sweetness that balances the salt.
Taste As You Go
Before you take it off the heat, taste a spoonful. Be careful not to burn your tongue. Does it need more salt? Maybe a little more cumin?
Cooking is not a science project; it’s an art. Adjust it until it tastes good to you. Once it’s perfect, take it off the heat immediately so it doesn’t dry out. Now you have the perfect base for your bowl.
 4")
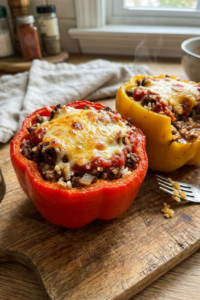
Assembling and Customizing Your Bowl
I used to think assembling a ground beef burrito bowl was just throwing everything into a dish and calling it a day. Boy, was I wrong. There is actually an architecture to this thing.
I remember one time I packed a bowl for lunch and put the lettuce on the very bottom. By the time I sat down to eat at noon, the heat from the rice had turned my crisp greens into warm, slimy mush. It was absolutely gross. I ended up ordering a sandwich instead. That was a sad day for my wallet and my stomach.
Since then, I have developed a very specific strategy for building these bowls. It might sound a little obsessive, but trust me, it makes a huge difference in how the food tastes.
The “Hot Bottom, Cold Top” Rule
This is the golden rule I live by. You have to separate the temperatures. Start with your base layer of hot ingredients. I always put a big scoop of cilantro lime rice right at the bottom.
Next comes the beans and the seasoned beef. This creates a solid foundation of warmth. If you put the cheese right on top of the hot meat now, it gets all melty and delicious. That is exactly what you want.
Do not put your cold ingredients, like lettuce or pico de gallo, directly on the steaming hot rice if you can avoid it. Layering it this way keeps the hot stuff hot and the cold stuff crisp until you are ready to dig in.
The Toppings Bar
This is where you can really show off. I like to pretend I run a little restaurant in my kitchen. My kids love it because they can pick and choose what they want without complaining about “green things” touching their meat.
I usually go heavy on fresh toppings to balance out the savory beef. A scoop of corn salsa adds a nice sweetness that cuts through the spice. And let’s be real, is it even a burrito bowl without a massive amount of guacamole? I don’t think so.
If you want to save time, store-bought salsa is fine. I won’t tell anyone. But if you have ten minutes, chopping up some fresh tomatoes and onions makes the bowl taste so much brighter.
Texture is Everything
One thing I learned after eating way too many soft, mushy bowls is that you need crunch. If everything in the bowl is soft—rice, beans, avocado, meat—it gets boring to eat pretty fast.
I always crush a handful of tortilla chips over the top right before serving. It adds that necessary salty crunch. If you are watching your carbs, pepitas (pumpkin seeds) are a fantastic alternative. They give you that snap without the corn.
The Final Drizzle
Don’t serve a dry bowl. It just feels incomplete. I used to just plop sour cream on top, but it was too thick to mix in well.
Now, I take a little sour cream, squeeze in some lime juice, and mix it until it’s runny enough to drizzle. It takes ten seconds, but it makes the dish look fancy and ensures you get a little bit of tanginess in every bite. It’s a total game changer.
 5")
Meal Prep and Storage for the Week
I have a love-hate relationship with meal prep. I love opening the fridge and seeing dinner ready to go. I hate spending my entire Sunday afternoon chopping vegetables while everyone else is watching football. But when it comes to a ground beef burrito bowl, the effort is actually worth it.
I used to prep these bowls all wrong. I would pile everything into one plastic container—rice, meat, cheese, salsa, sour cream—and shove it in the fridge. By Wednesday, the sour cream had curdled into the hot sauce, and the container was stained that permanent “spaghetti orange” color that never washes out. It was gross. I ended up throwing half of it away.
Container Strategy
If you are serious about this, invest in glass containers. I resisted for years because they are heavier and more expensive, but plastic absorbs smells like you wouldn’t believe. I once ate a burrito bowl that tasted vaguely like the curry I had stored in that container the week before. Not a good flavor combination.
Glass cleans up easily and microwaves evenly. Plus, you can see exactly what is inside without having to crack the lid. It just makes your fridge look organized, which gives me a weird sense of peace.
The Separation Rule
Here is the biggest lesson I have learned: keep the cold stuff cold. Do not, under any circumstances, put your guacamole or sour cream in the same container that you plan to microwave.
I bought a set of those tiny little dressing cups, the ones that look like what you get at a takeout place. I fill those with my salsa, guac, and sour cream, and just tuck them inside the larger container. When it’s time to heat up my lunch at work, I pull the little cups out first. It takes two seconds, but it saves your meal from becoming a warm, soupy disaster.
Reheating Without Drying Out
Leftover rice can get crunchy in the fridge. It turns into little pebbles that break your teeth. To fix this, I sprinkle a few drops of water over the rice and ground beef before popping it in the microwave.
Cover the container with a damp paper towel while you zap it. The steam brings the rice back to life and keeps the meat juicy. I usually heat it for 90 seconds, stir, and maybe do another 30 seconds.
How Long Does It Last?
I usually only prep for 3 to 4 days max. The FDA says leftovers are good for 3-4 days, and honestly, by day 5, the rice starts to get a weird texture anyway.
If you made way too much meat (which I always do), freeze the cooked beef separately. It freezes beautifully. Just put the seasoned beef in a freezer bag, squeeze the air out, and toss it in the freezer for up to 3 months. Future you will be so happy on a lazy Tuesday night when you realize dinner is halfway done.
 6")
Making this ground beef burrito bowl has become a weekly ritual in my house because it proves that healthy, gluten-free cooking doesn’t have to be complicated or expensive. It is a total wallet-saver compared to takeout, and even my pickiest neighbors ask for seconds, which is the ultimate win. Don’t stress about perfection—whether you burn the rice slightly or swap ingredients, this recipe is incredibly forgiving and designed to make your busy weeknights easier. If you loved this easy dinner idea and want to find it again when the hunger panic sets in, please share this recipe on Pinterest!