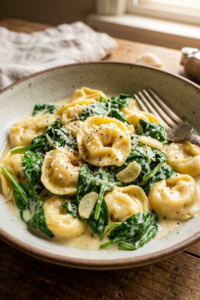
Did you know that the average person spends over 40 minutes just deciding what to cook for dinner? Stop scrolling! I have been there, staring into the fridge, wishing dinner would just make itself. This creamy garlic parmesan tortellini is going to save your weeknight! It’s lush, it’s cheesy, and honestly, it tastes like you spent hours in the kitchen when you really only spent twenty minutes. I’m not joking—this sauce is liquid gold! We are talking about tender pasta swimming in a velvety garlic-infused sauce that hugs every single curve of the tortellini. Let’s dive right in!
 1")
Essential Ingredients for Creamy Garlic Parmesan Tortellini
When I first started making this for my family, I thought any old pasta would work. I was wrong. If you want this to taste like something you’d get at a fancy Italian spot, you have to pick the right stuff. I’ve spent years teaching kids and cooking for my own family, and if there is one thing I have learned, it is that the ingredients are the most important part of the meal. You don’t need a bunch of expensive tools to make a great dinner, you just need a few good items from the store.
Choosing the Best Tortellini
I really suggest getting the refrigerated bags of tortellini. You can usually find them in the deli section or near the fancy cheeses at your grocery store. These taste so much better than the hard, dried pasta you find in the middle aisles. The refrigerated ones only take about three minutes to cook, so they stay nice and firm. I usually go for the three-cheese blend because my kids are picky, but the spinach or mushroom ones are also really tasty. Just make sure you don’t boil them too long, or they will fall apart when you mix them into the hot sauce.
Why Fresh Garlic is a Must
I know it is tempting to use that garlic that comes pre-chopped in a little glass jar. It’s easy, right? But honestly, for a sauce like this, you need the real deal. I usually grab four or five big cloves of fresh garlic. When you smash and mince them yourself, the flavor is much stronger and sweeter. The jarred stuff often has a weird, sour taste that can really mess up your cream sauce. I like to mince mine very small so that the flavor gets into every single drop of the cream without anyone biting into a huge chunk of raw garlic.
The Secret to a Smooth Sauce
The biggest mistake people make is using the cheese from the green plastic shaker bottle. I am begging you, please don’t do that here! That cheese has stuff in it to keep it from sticking together in the can, and that same stuff makes your sauce feel grainy in your mouth. Get a block of real Parmesan cheese and grate it yourself. It takes about two minutes of work, but it melts so perfectly. This is how you get that velvet texture that makes the meal feel special.
Don’t Be Afraid of the Heavy Cream
For the base, you want to use heavy whipping cream. I have tried using milk or half-and-half to save a few calories, but the sauce ends up way too thin. Heavy cream gets thick and bubbly as it cooks, which helps it stick to the pasta. You want that sauce to hug every curve of the tortellini so you get a burst of flavor in every bite. I also like to add a big tablespoon of butter at the start to help toast the garlic. It makes the whole house smell amazing!
 2")
How to Make Creamy Garlic Parmesan Tortellini: Step-by-Step
Making this dish is actually pretty fast, which is why I love it for those nights when I get home late and everyone is already hungry. I remember the first time I tried to make a cream sauce; I was so scared I would burn the milk! But once you do it a few times, you’ll see it is quite simple. You just have to stay near the stove and keep an eye on things. Here is exactly how I put this together in my own kitchen.
Boiling the Pasta to Perfection
First, get a big pot of water going. You want to add a good pinch of salt to the water—it should taste a bit like the ocean. Once it’s at a rolling boil, drop in your tortellini. Now, here is the trick: check the package for the “al dente” time. Usually, for fresh pasta, it only takes 2 to 4 minutes. I always pull mine out about a minute early. Why? Because the pasta is going to cook a little bit more once we throw it into the hot sauce. If you cook it all the way in the water, it might get mushy later, and nobody likes soggy pasta. Before you drain it, scoop out a small cup of that starchy pasta water.
Sautéing the Garlic and Butter
While your water is boiling, get a large skillet on medium heat. Drop in your butter and let it melt until it starts to bubble just a little. Toss in your fresh minced garlic. You only need to cook this for about a minute. You’ll know it’s ready when your whole kitchen starts to smell great. Be careful not to let the garlic turn brown or black, though. If it burns, it gets bitter, and you’ll have to start over. I’ve done that more times than I can count!
Simmering the Creamy Sauce
Now, pour in your heavy cream. Turn the heat down just a little bit so it’s at a gentle simmer. You don’t want a crazy boil here, just some small bubbles. Let it sit there and cook for about 5 minutes. You will see it start to get a bit thicker. This is where the magic happens. Once it looks creamy, stir in your freshly grated parmesan cheese. Keep stirring until the cheese is all melted and the sauce looks smooth. If it looks too thick, you can splash in a little of that pasta water you saved.
Bringing it All Together
Finally, toss your drained tortellini right into the skillet with the sauce. Use a big spoon to gently coat every piece of pasta. I usually let it sit on the low heat for just one more minute so the pasta can soak up some of that garlic flavor. Sprinkle some fresh parsley or a little bit of black pepper on top, and you are ready to eat! It’s so fast, you’ll probably finish cooking before the kids even set the table.
 3")
Pro Tips for the Perfect Cheesy Tortellini Sauce
I’ve made this recipe hundreds of times, and I’ve learned a few things the hard way. Cooking for a house full of people means you have to get it right, or you’re just ordering pizza later. Here are some of the best tricks I’ve picked up over the years to make sure your sauce comes out great every single time. It’s the little things that really make a difference between a “just okay” meal and one that everyone asks for seconds of.
Don’t Let it Get Too Hot
This is the most important tip I can give you. When you are ready to add that freshly grated parmesan cheese, you really should turn the stove off or move the pan to a cool burner. I used to keep the fire going, and my sauce would sometimes turn into a clumpy, oily mess. That happens because the cheese gets shocked by the high heat. By letting the sauce cool down just a tiny bit for thirty seconds before you stir in the cheese, you get that perfectly smooth, velvet texture. It makes such a huge difference in how the food feels in your mouth!
Balancing the Salty and the Sour
Since parmesan cheese is naturally very salty, you usually don’t need to add extra salt to the sauce. In fact, if you add too much, it can be hard to eat. I like to balance that saltiness with a little bit of acid. Sometimes I’ll squeeze just a tiny bit of fresh lemon juice into the pan right at the end. It doesn’t make it taste like lemons, but it “wakes up” the flavor and cuts through all that heavy cream. I also always throw in some red pepper flakes for a little kick and plenty of cracked black pepper.
Bulking it Up with Protein
If you have a really hungry family, you might want to add some meat. I often grill a couple of chicken breasts and slice them thin to put on top. If I’m in a real hurry, I’ll just grab a rotisserie chicken from the store and shred it up. Italian sausage is another great choice because the spices in the meat go so well with the garlic sauce. If you want something a bit fancier, sautéed shrimp works beautifully too. Just cook the meat separately and toss it in at the end so it doesn’t get overcooked.
Sneaking in the Greens
I’m always trying to get more vegetables into my kids’ diets. The best part about this creamy sauce is that it hides veggies really well. I love to throw a few handfuls of fresh baby spinach into the pan during the last minute of cooking. The heat from the sauce will wilt the spinach perfectly without you having to do any extra work. Sun-dried tomatoes are also a great addition if you want a bit of sweetness and a pop of red color. Peas are another easy one—just toss them in frozen, and they’ll heat up in seconds.
 4")
Storage and Reheating Leftover Creamy Pasta
I don’t know about your house, but in mine, there is hardly ever any leftovers when I make this. My kids usually scrape the pan clean! But sometimes, if I am smart, I make a double batch so I have something to take for lunch the next day. Storing and reheating creamy pasta can be a little tricky because that beautiful sauce you worked so hard on can turn into a greasy mess if you aren’t careful. I have messed this up plenty of times before I figured out the right way to do it.
Putting it Away Right
Don’t let the pasta sit out on the kitchen counter for hours after you’re done eating. As soon as dinner is over, grab an airtight container and get it in the fridge. I like to use those glass containers because they don’t hold onto the garlic smell as much as the plastic ones do. This meal will stay good for about three or four days. If you wait much longer than that, the pasta gets way too soft and the sauce starts to taste a bit off. Just make sure the lid is on tight so it doesn’t dry out in the cold air.
The Secret to Reheating on the Stove
When you pull the tortellini out of the fridge the next day, it is going to look like a solid block of pasta. Don’t worry, that’s normal! The cream and cheese just firmed up in the cold. The best way to fix this is on the stove. Put your leftovers in a small pan and add a splash of milk or even just a tiny bit of water. Turn the heat to low and stir it gently. As it warms up, the milk will mix back into the sauce and make it creamy again. If you just heat it up without adding more liquid, the sauce will break and get very oily.
Why You Should Avoid the Freezer
People always ask me if they can freeze this to save for later. Honestly? I wouldn’t do it. Dairy sauces with heavy cream and lots of parmesan cheese just don’t freeze very well at all. When they thaw out, the fat usually separates from the liquid and it looks really curdled and gross. It is much better to just make what you need and eat it fresh. If you have extra tortellini that isn’t cooked yet, you can freeze that, but once the sauce is on it, it’s a no-go! Trust me, it’s worth the twenty minutes to just make a fresh batch when you want it again!
 5")
Bringing the Best Tortellini to Your Table
I really hope you give this creamy garlic parmesan tortellini a try soon. It’s one of those meals that just makes the whole day feel better. After a long day at school or work, sitting down to a big bowl of warm, cheesy pasta is exactly what the soul needs. I know it can be hard to find new recipes that actually work and taste good, but I’ve made this so many times I could probably do it with my eyes shut! It really is that simple, and it never fails to impress anyone who sits at my table.
Why This Recipe is a Keeper
When you’re standing in the grocery store later today, just remember to grab those fresh ingredients we talked about earlier. Getting the real parmesan cheese and the fresh garlic makes all the difference in the world. It’s the difference between a dinner that’s just okay and a dinner that makes everyone at the table go quiet because they’re too busy eating. I love seeing my family enjoy a meal I made from scratch, even if it only took me twenty minutes to pull it together. It gives me a little bit of pride to know I fed them something high-quality without spending all night over a hot stove.
Make it Your Own
One thing I love about this dish is how much you can change it up based on what you have in the fridge. If you’re feeling like you need some extra protein, throw in some grilled chicken or even some crispy bacon bits. If you want to be a bit healthier, pile in that spinach or some chopped broccoli. It’s a very forgiving recipe, so don’t be afraid to mess around with it a bit. Cooking should be fun, not a chore! I’ve found that the more I experiment in the kitchen, the more my kids actually want to help me cook, which is a big win in my book.
If you do end up making this, I’d love to hear how it went for you. Did your family love it as much as mine does? Maybe you found a cool new ingredient to add that I haven’t tried yet! There is always something new to learn when you’re cooking for people you love. Before you go and start boiling your water, please do me a quick favor. If you think this recipe looks good, make sure to pin it to your favorite Dinner Ideas board on Pinterest! It really helps me out, and it makes it super easy for you to find the recipe again the next time you are stuck wondering what to make for dinner. Happy cooking, and I hope your kitchen smells amazing tonight!