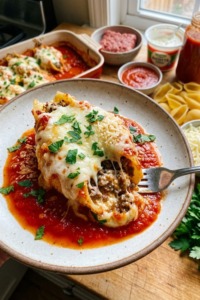
I used to think that getting a real crunch on chicken required a deep fryer and a lot of oil splatters on my favorite shirt! It was such a pain to clean up. But then I found out that about 70% of home cooks actually prefer baking their “fried” favorites to save on calories and mess. Seriously, who has time to scrub grease off the stove? Not me! This baked chicken parmesan with crispy coating and melted mozzarella recipe is my absolute go-to when I want comfort food that doesn’t feel like a heavy gut-punch. It is so good!
The secret is all in how we treat the breadcrumbs and the oven temperature. I’ve tested this dozen of times in my own kitchen, and I finally cracked the code for 2026. You get that golden, shattered-glass crunch on the outside, but the chicken stays so juicy on the inside. It’s like magic! We are going to use some panko, a little bit of herb action, and just enough cheese to make your heart happy. Let’s get into it!
 1")
The Secret to a Truly Crispy Coating Without Frying
I spent years trying to figure out how to get that “fried” crunch in a regular oven. I have had more soggy, sad dinners than I care to admit! It was pretty frustrating. I used to think I just wasn’t a good cook. But then I realized that you can’t just follow a standard recipe and expect it to work like magic. You need a few specific tricks to make your baked chicken parmesan with crispy coating and melted mozzarella recipe actually taste like it came out of a professional kitchen. The biggest problem is moisture. If the coating gets wet, it gets mushy. It’s that simple.
Why Panko is Better Than Regular Crumbs
First, you have to throw away those sandy, fine breadcrumbs in the blue can. They are too small. They soak up the juices from the chicken like a sponge, and that is how you end up with a soggy mess. I always use Panko breadcrumbs. These are Japanese-style crumbs that look like little flakes. Because they are bigger and have more surface area, they stay crunchy even when they get hit with sauce and cheese. They provide a light, airy texture that regular crumbs just can’t match.
The Magic of Pre-Toasting Your Crumbs
This is the step most people skip because they are in a hurry. I get it; I’m a teacher, and I’m usually exhausted after a long day at school! But taking five minutes to toast your panko in a pan with a little bit of olive oil is the best thing you can do. Since an oven bakes with dry heat, it takes a long time for crumbs to turn brown. Often, your chicken is overcooked and dry before the breading looks golden. By browning them in a skillet first, you start with a perfect color. It makes the final dish look like you spent hours on it.
Setting Up a Proper Breading Station
You need a solid system if you want the coating to actually stay on the meat. I call it the “dry-wet-dry” method. First, you coat the chicken in a little bit of flour. This dries the surface so the egg can stick. Then, you dip it in the egg wash. Finally, you press it firmly into your toasted panko. If you skip the flour, the breading will probably slide right off when you try to cut it. It’s a common mistake, but once you fix it, your chicken will look much better.
Give the Chicken Some Space
Finally, do not crowd your baking sheet. I used to try and squeeze six big pieces of chicken onto one small tray. That is a huge mistake! When the chicken pieces are too close together, they release steam. That steam gets trapped and turns your crispy coating into a wet blanket. It’s a good idea to leave at least an inch of space between each piece. If you have a wire cooling rack, put that on top of your baking sheet and cook the chicken on the rack. This lets the hot air move under the chicken so the bottom gets just as crispy as the top. Using these steps will make sure your dinner is a hit every single time!
 2")
Choosing the Right Mozzarella for that Perfect Cheese Pull
Let’s talk about the cheese. This is where a lot of people mess up their baked chicken parmesan with crispy coating and melted mozzarella recipe. I have seen it happen so many times! You want that gooey, stretchy cheese that you see in the commercials, right? But sometimes you end up with a watery mess on your plate. I remember one time I tried to be fancy. I went to the store and bought the most expensive fresh mozzarella I could find. It was floating in a container of water. I thought, “This is going to be the best meal ever!” Boy, was I wrong.
Why Fresh Isn’t Always Better
As soon as I put those slices of fresh cheese on the chicken and put it in the oven, things started going south. Fresh mozzarella has a lot of water in it. When it heats up, all that water comes out. My crispy chicken was sitting in a pool of milky liquid. It was so sad! The breading got all soft and the sauce was diluted. My husband still ate it, because he’s nice like that, but I knew it was a fail. If you want a crispy result, you have to stay away from the stuff in the water. It just adds too much moisture to a dish that needs to stay dry and crunchy.
The Low-Moisture Block Secret
What you actually want is low-moisture mozzarella. It is the kind that comes in a solid block or a bag of shreds. I prefer the block. I usually grab a block of part-skim mozzarella and shred it myself using a box grater. It melts way better than the pre-shredded stuff. The pre-shredded bags have a powdery coating on them to keep the cheese from sticking together in the bag. That powder can stop the cheese from melting into one big, gooey layer. It takes about two minutes to grate it yourself, and it makes a huge difference for your dinner.
Adding That Extra Salty Kick
I also like to mix in a little bit of parmesan with my mozzarella. Mozzarella is great for the stretch, but it doesn’t have a ton of flavor on its own. Parmesan adds that salty, nutty punch that makes the baked chicken parmesan with crispy coating and melted mozzarella recipe really pop. I usually do about three parts mozzarella to one part parmesan. It is a combo that never fails me. I’ve tried using just mozzarella before, and it was okay, but it felt like it was missing something. That parmesan really fills in the gaps.
Getting the Temperature Right
You want to wait until the chicken is almost done before you add the cheese. If you put it on too early, the cheese will burn before the chicken is cooked through. I wait until the internal temp of the chicken is about 155 degrees. Then I pile on the cheese and pop it back in. By the time the chicken hits 165, the cheese is bubbly and perfect. It is the easiest way to make sure everything comes out just right. Sometimes I even turn on the broiler for the last thirty seconds to get those little brown spots on the cheese. Just keep a close eye on it so you don’t burn the whole thing!
 3")
Preparing Your Chicken Breasts for Even Baking
Getting the chicken ready is probably the most boring part of this baked chicken parmesan with crispy coating and melted mozzarella recipe, but you really can’t skip it. I’ve learned that the hard way more times than I want to say! If your chicken pieces are all different sizes and shapes, some will be raw while others end up feeling like rubber. It is really frustrating to pull a tray out of the oven and realize half the dinner isn’t safe to eat yet while the other half is already drying out.
Dealing with the “Lightbulb” Shape
Most chicken breasts you buy at the grocery store are shaped kind of like lightbulbs. They have a fat, rounded top and a skinny, thin bottom. This is a huge problem for baking. If you put that straight in the oven, the thin part gets cooked way before the fat part. By the time the thick middle is safe to eat, the thin part is basically a shoe sole. It’s hard to chew and nobody at the table will be happy. To fix this, you have to make the chicken the same thickness all the way across. It makes the whole piece cook at the exact same speed so every bite is tender.
My Big Messy Lesson with the Mallet
I remember the first time I tried to flatten chicken. I didn’t have a plan at all. I just put the chicken on the wooden cutting board and started hitting it with a heavy frying pan. It was a total disaster! Bits of raw chicken juice flew everywhere—on my clean shirt, on the cabinets, and even on the toaster. It was pretty gross and took forever to clean up. Now, I always put the chicken between two sheets of plastic wrap first. Or, I put it inside a big gallon-sized freezer bag. That way, the mess stays inside the plastic and not on my kitchen walls. You don’t have to hit it super hard, either. Just a few firm taps with a meat mallet or the bottom of a heavy skillet will do the trick. Aim for about a half-inch thickness.
Seasoning the Meat Directly
Another thing I used to do wrong was only putting salt and pepper in the flour or the breadcrumbs. I thought that was enough. But the meat itself needs flavor too! Before I even start the breading station for my baked chicken parmesan with crispy coating and melted mozzarella recipe, I give the chicken a good sprinkle of salt and garlic powder on both sides. This makes sure that every single bite has flavor, not just the crunchy outside. If the meat is bland, the whole dish feels a bit boring.
Don’t Guess the Temperature
Lastly, please buy a digital meat thermometer. I used to try and poke the chicken with my finger or cut it open to see if it was still pink inside. Cutting it open is a bad idea because all the juice runs out and leaves the meat dry. If you use a thermometer and pull the chicken out right when it hits 165 degrees, it stays so juicy and delicious. It is the best money I ever spent on my kitchen. It takes all the guessing out of the job!
 4")
Serve and Share Your Masterpiece!
I really hope you give this baked chicken parmesan with crispy coating and melted mozzarella recipe a try tonight or sometime soon. It’s one of those meals that makes the whole house smell like a professional Italian restaurant. Every time I make it, my neighbors probably wonder why they weren’t invited over! As a teacher, I’m used to grading papers and dealing with chaos all day, so having a reliable dinner like this is a huge relief. It’s a meal that feels special but doesn’t take all night to put together. Plus, seeing the kids actually finish their plates without complaining is a win in my book.
When you’re ready to serve, I usually suggest putting it over a nice bed of pasta. Spaghetti or linguine works great because they soak up any extra marinara sauce. If you want to keep things a bit lighter, I’ve also served this with a big green salad or even some roasted zucchini. The fresh crunch of the vegetables goes really well with the savory, melted cheese. Just make sure you don’t let the chicken sit on the counter for too long before eating. To keep that coating as crispy as possible, you want to serve it while it’s still piping hot from the oven.
If you happen to have leftovers—which doesn’t happen often at my house—you have to be careful about how you reheat them. Please, stay away from the microwave! The microwave is where crispy food goes to die. It will turn your beautiful breading into a soggy sponge in about thirty seconds. Instead, put the leftover chicken back in the oven or an air fryer for a few minutes. It helps bring back some of that crunch so it tastes almost as good as the first night. My husband actually likes the leftovers cold in a sandwich the next day, but I prefer that melted cheese to be nice and bubbly.
I’m so glad I could share my kitchen experiences with you. Cooking should be fun, even when things get a little messy like my mallet incident! If you found these tips helpful and you’re excited to try this baked chicken parmesan with crispy coating and melted mozzarella recipe, please do me a small favor. Take a second to pin this recipe to your Pinterest boards! It really helps other home cooks find these helpful tips so they can avoid the same soggy mistakes I made. Happy cooking, and I hope your family loves it as much as mine does!